abp学习第九篇
本篇将介绍 ABP 框架中的中间件(Middleware)与请求管道扩展机制,帮助你理解如何在 ABP 项目中自定义和扩展 HTTP 请求处理流程。
1. ABP 中的中间件机制
ABP 基于 ASP.NET Core,天然支持 ASP.NET Core 的中间件机制。你可以像在原生 ASP.NET Core 项目中一样,在 Startup 或 Program 中通过 app.UseXXX() 注册中间件。
ABP 还提供了模块化的中间件注册方式,可以在模块的 OnApplicationInitialization 方法中注册自定义中间件,实现更灵活的请求管道扩展。
示例:自定义中间件
1 | public class MyCustomMiddleware |
注册方式:
1 | app.UseMiddleware<MyCustomMiddleware>(); |
2. 在 ABP 模块中扩展请求管道
在 ABP 的模块类(继承自 AbpModule)中,可以重写 OnApplicationInitialization 方法,获取 IApplicationBuilder,并注册中间件。例如:
1 | public override void OnApplicationInitialization(ApplicationInitializationContext context) |
这样可以实现模块级别的请求管道扩展,便于功能解耦和复用。
3. 中间件顺序调整
中间件的执行顺序非常重要,决定了请求和响应经过各个中间件的先后顺序。在 ABP(以及 ASP.NET Core)中,中间件的注册顺序就是其执行顺序。
- 在
Program.cs或Startup.cs中,app.UseXXX()的调用顺序决定了中间件的排列。 - 在 ABP 模块中注册的中间件,会插入到
OnApplicationInitialization方法被调用的位置。 - 如果有多个模块注册中间件,模块的依赖顺序(
DependsOn)会影响初始化顺序。
示例:调整顺序
1 | app.UseMiddleware<FirstMiddleware>(); |
上例中,FirstMiddleware 会先于 SecondMiddleware 处理请求。
建议:将全局性、通用性强的中间件(如异常处理、日志)放在前面,业务相关的中间件放在后面。
4. 实践建议
- 优先使用 ABP 的模块化机制注册中间件,便于维护和扩展。
- 合理划分中间件职责,避免单一中间件过于臃肿。
- 善用 ABP 的依赖注入能力,将服务注入到中间件中。
5. 总结
ABP 框架充分利用了 ASP.NET Core 的中间件和请求管道机制,并通过模块化方式进一步增强了扩展性。掌握中间件的注册、顺序调整与使用,有助于构建灵活、可维护的企业级应用。
Abp框架学习笔记(八):Abp中的依赖注入与服务生命周期
本篇将介绍 Abp 框架中的依赖注入(DI)机制及服务生命周期管理,帮助你在实际开发中更好地理解和应用 Abp 的 IoC 容器。
1. Abp 的依赖注入简介
Abp 框架内置了强大的依赖注入系统,默认基于 Microsoft.Extensions.DependencyInjection,支持属性注入、构造函数注入、方法注入等多种方式。
- 自动注册:继承自
ITransientDependency、ISingletonDependency、IScopedDependency的服务会被自动注册到 IoC 容器。 - 模块化注册:可在模块的
ConfigureServices方法中手动注册服务。
2. 服务生命周期
- 瞬时(Transient):每次请求都会创建新实例。适合无状态服务。
- 作用域(Scoped):同一次请求(如 Web 请求)内共享同一实例。适合有状态但仅在请求内共享的服务。
- 单例(Singleton):全局唯一实例,应用程序生命周期内只创建一次。适合全局缓存、配置等。
Dive into the New Features of .NET 8
Dive into the New Features of .NET 8
In today’s rapidly evolving technological landscape, the .NET framework is constantly evolving to adapt to new demands and challenges. As the latest iteration, .NET 8 brings numerous exciting new features and improvements, empowering developers to build applications more efficiently. Below, we delve into several key features of .NET 8.
First and foremost, let’s look at the performance enhancements. Performance has always been a key focus area for the .NET framework. In .NET 8, Microsoft introduces a new feature called “performance counters,” which helps developers gain insights into their application’s performance bottlenecks and take appropriate optimization measures. Additionally, .NET 8 includes optimizations to many existing components and libraries, aiming to enhance the overall performance of applications. This includes improvements to the asynchronous programming model and better support for cloud-native applications.
When it comes to the asynchronous programming model, .NET 8 introduces a new type of coroutine. Coroutines are lightweight threads that can handle asynchronous operations and long-running tasks more naturally. Compared to traditional threads, coroutines can execute multiple asynchronous operations on the same thread, eliminating the overhead of thread switching and context switching. This not only improves the efficiency of program execution but also makes code easier to write and understand.
For cloud-native applications, .NET 8 provides improved support. Cloud-native applications are designed according to a set of principles that enable them to better adapt to containerized and microservices architectures. .NET 8 makes it easier to deploy applications to platforms like Kubernetes, while supporting the use of containerization tools like Docker for packaging and distribution. These features make .NET 8 an ideal choice for building cloud-native applications.
In addition, .NET 8 introduces new development tools such as R#, Visual Studio Code, and Visual Studio IDE. These tools greatly enhance developer productivity, enabling them to write, debug, and test code more efficiently.
Cross-platform compatibility has always been an essential feature of the .NET framework. With .NET 8, this aspect is further enhanced, allowing developers to build cross-platform applications that can run on multiple platforms, including Windows, macOS, and Linux operating systems. This means developers can use .NET 8 to build applications that better cater to the needs of diverse user bases.
Artificial intelligence (AI) and machine learning are among the hottest technology trends today. .NET 8 ships with built-in support for AI and machine learning, making it easier for developers to incorporate these technologies into their applications. This provides developers with a significant advantage in应对 market challenges.
Lastly, security is a critical aspect of any software development project. In .NET 8, Microsoft makes further improvements to security. These include better code signing and encryption techniques, limitations on .NET reflection, and enhancements to code access controls. These improvements help developers build more secure applications that protect user data and privacy.
In conclusion, .NET 8 introduces numerous exciting new features and improvements that provide developers with more tools and options for building efficient, secure, cross-platform applications. Whether it’s performance, asynchronous programming models, cloud-native support, developer tools, cross-platform compatibility or security, .NET 8 showcases its capabilities and strength. If you’re a developer or looking for a robust development framework to build your applications with, .NET 8 is definitely worth considering.
零宽断言在低版本Safri的兼容处理
零宽断言在低版本Safri的兼容处理
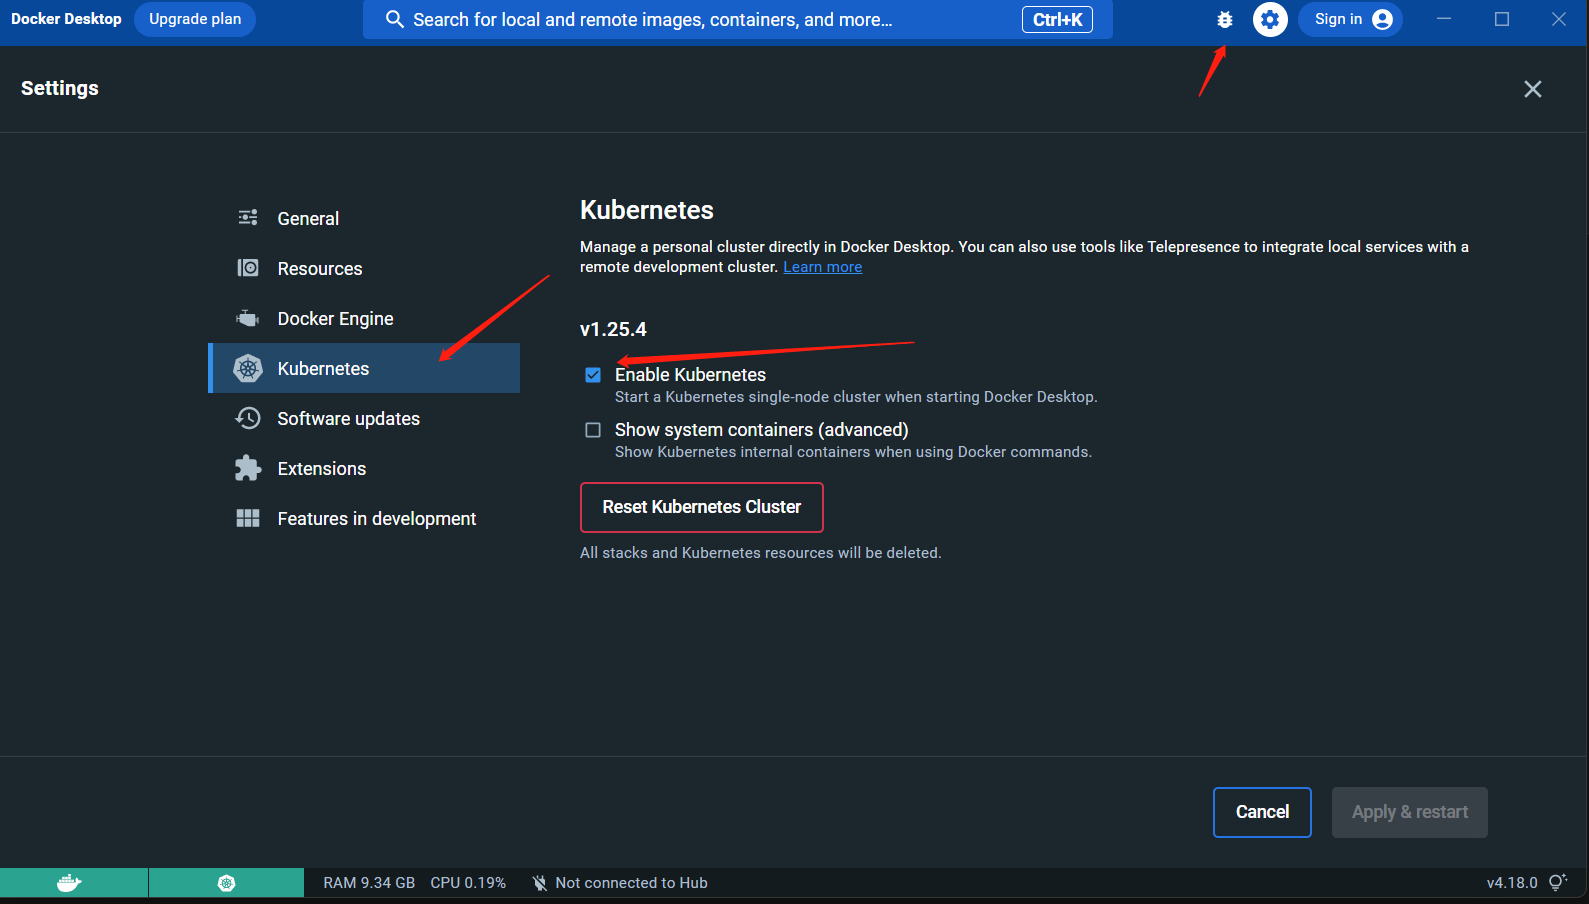
kubernetes初接触
概念
kubectl
Kubernetes 命令行工具 kubectl, 让你可以对 Kubernetes 集群运行命令。 你可以使用 kubectl 来部署应用、监测和管理集群资源以及查看日志。
安装
Windows 11 使用 winget:
1 | winget install -e --id Kubernetes.kubectl |
验证 kubectl 配置
如果你想在自己的笔记本上(本地)运行 Kubernetes 集群,你需要先安装一个 Minikube 这样的工具
1 | winget install minikube |
初识 MASA Framework
MASA Framework
全新的.NET现代应用开发,提供分布式应用运行时–基于Dapr云原生最佳实践,能够快速实现分布式、微服务、DDD,SaaS等现代应用开发。官方文档参阅
先决条件
开发计算机上应安装以下工具:
一个集成开发环境 (比如: Visual Studio) 它需要支持 .NET 6.0 的开发.
环境配置
MacOS dotnet环境配置
1 | # 下载对应脚本进行安装 https://dotnet.microsoft.com/zh-cn/download/dotnet/scripts |